
Teaching my Fujifilm X-T30 II to Print on an instax Link 3
Adding Bluetooth instax printing to a Fujifilm camera that never had it, and finding a bug in Fuji’s firmware along the way
The Problem
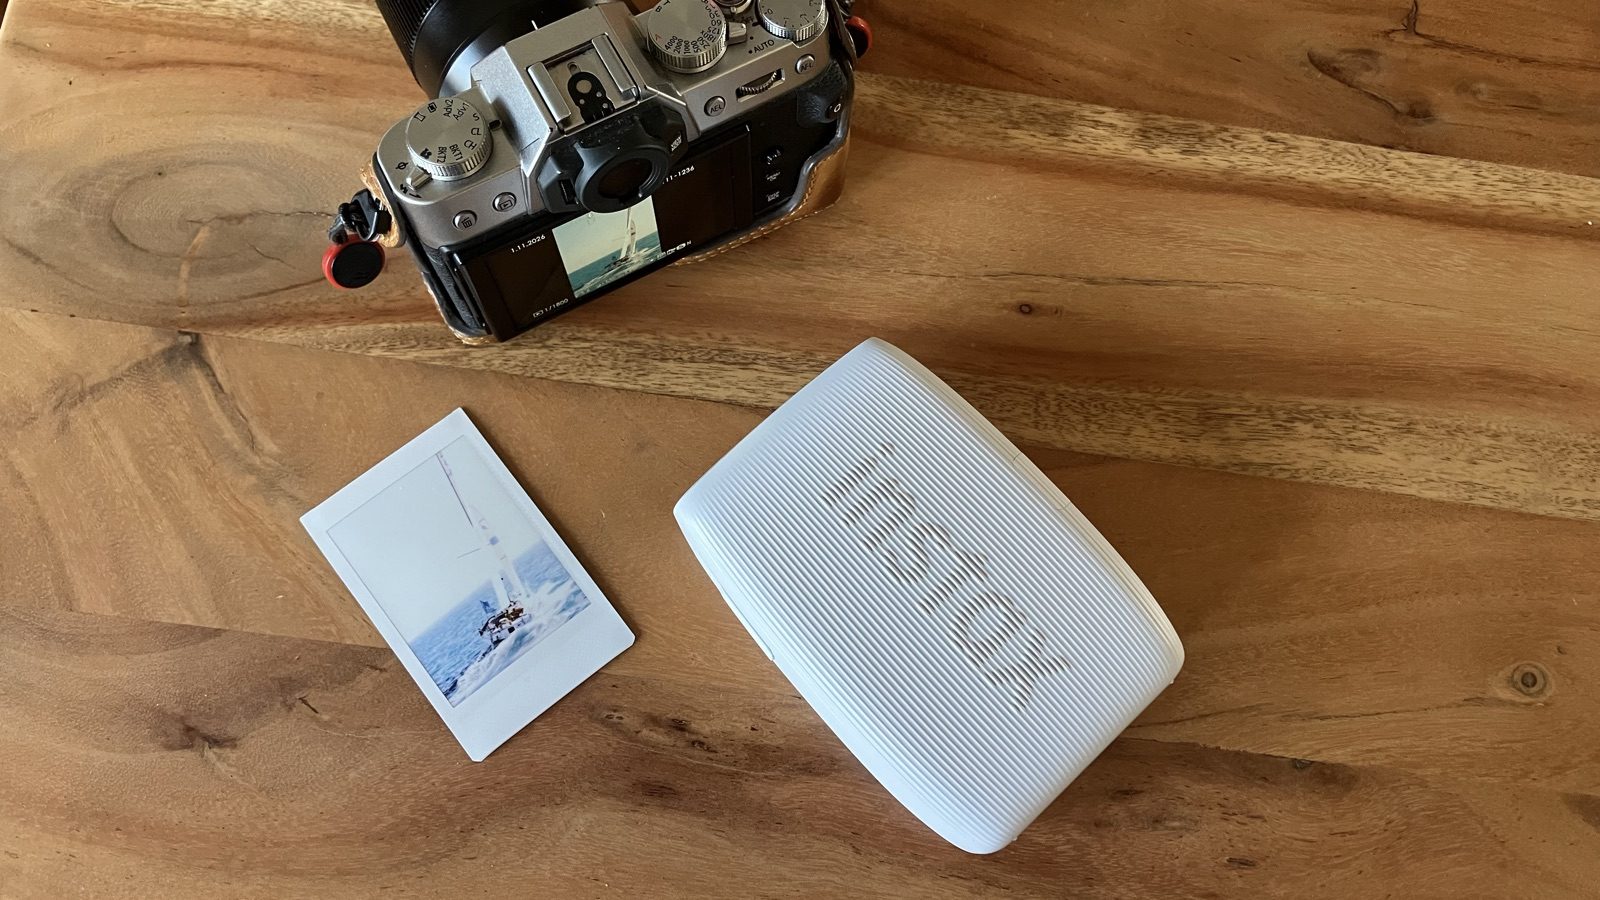
I travel with a Fujifilm X-T30 II and a small instax mini Link 3 printer, which I bought during a trip to China. I like giving prints to people I meet, or slipping them into postcards. I also like to travel without my phone as much as I can. But today the phone is the middleman: copy the photo to it, open the instax app, print from there. It works, but it is slow and it kills the fun.
Naively, I thought a fairly recent Fujifilm camera would print to it natively. I had even seen the “instax printer print” entry in the menus. It doesn’t. The X-T30 II only knows the old Wi-Fi printers (SP-1, SP-2, SP-3). Newer ones like the Link 3 use a different protocol over Bluetooth LE. Fujifilm added it to newer cameras like the X-S10, never to mine. And mine is already on its latest firmware, so no update is coming.
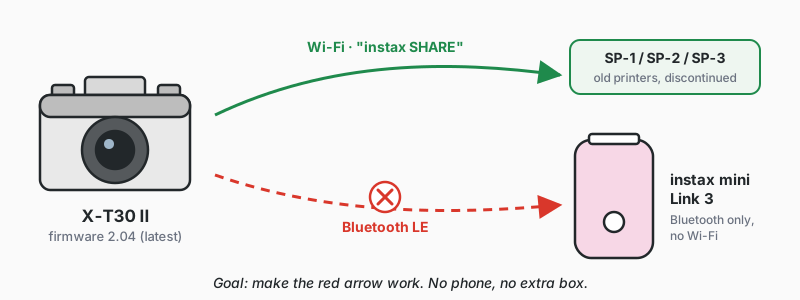
So the only way was to change the firmware. I had never looked at camera firmware before.
Rule zero: don’t brick the camera
Before anything, I set a few rules. A bricked camera is an expensive paperweight, and people in the community have bricked bodies by poking at random memory addresses.
I never write to the flash, the memory chip where the camera keeps its firmware. Everything runs in RAM, so pulling the battery brings back the stock camera. Every write to the camera needs my explicit OK, and the original bytes are checked first. I prefer reading files on the Mac over probing the camera. And I don’t waste film, because an instax sheet costs about a euro.
These rules made the project slower, but I never had a moment of panic.
Step 1: Opening the firmware
Fujifilm publishes firmware updates on its website, one .DAT file per camera. The format isn’t documented, but FujiHack had already done part of the work on older bodies.
Unpacking it took three steps. First, cut the header. The first bytes are an ID card for the file: camera model, version, checksums. The code comes after. Then, flip every bit: every 0 becomes a 1 and every 1 a 0. That’s all the “encryption” there is. Finally, decompress. What’s left is four compressed blocks. Fuji uses its own flavour of LZ, the classic trick behind ZIP: when a sequence of bytes repeats, it isn’t stored again but replaced by “copy 20 bytes from 300 bytes back”.
I wrote a small Python script, fujifw.py, that does all three. To check it, I had a free test: the firmware contains some well-known data tables from zlib, a public compression library. If they come out byte for byte identical to the published ones, the decompression is right.
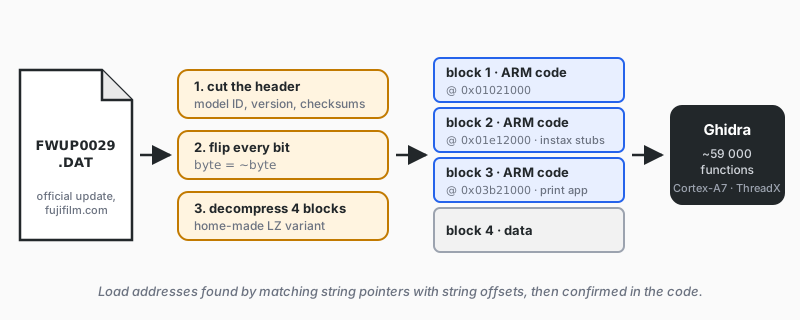
Three of the blocks are machine code for the camera’s processor (an ARM Cortex-A7 running ThreadX, a small real-time OS). Machine code is just bytes. To read it I used Ghidra, a free reverse engineering tool released by the NSA. You give it a binary, it finds the functions and turns the bytes into assembly, then into C-like code. No names, no comments, but readable.
Ghidra first needs to know where each block sits in the camera’s memory. The firmware doesn’t say, so I had to work it out. The code is full of pointers to text messages. If I guess the wrong starting address for a block, those pointers land in the middle of nowhere. There is only one starting address where they all land on the start of a real message. With that, Ghidra found about 59,000 functions. I ran it from scripts instead of its interface, so Claude could ask it for any function directly.
Step 2: The code was already there
59,000 functions with no names is a lot. But I had a trick: the X-S10 uses the same processor and does print to Link printers. So I unpacked its firmware too and compared the two.
I wrote a fuzzy matcher. It compares whole functions and ignores the addresses inside them, which change from one build to another (more on that later). I ran it on the 176 functions of the X-S10 print code. 109 of them had a twin in my camera that was at least 90% identical.
That was the big surprise: the X-T30 II already contains Fujifilm’s Bluetooth print app. Cropping, rotation, JPEG encoding, progress screens, it’s all there. Only the bottom layer, the part that talks to the printer over Bluetooth, was left out when Fuji built this firmware. In its place are empty functions, stubs that just return 0.
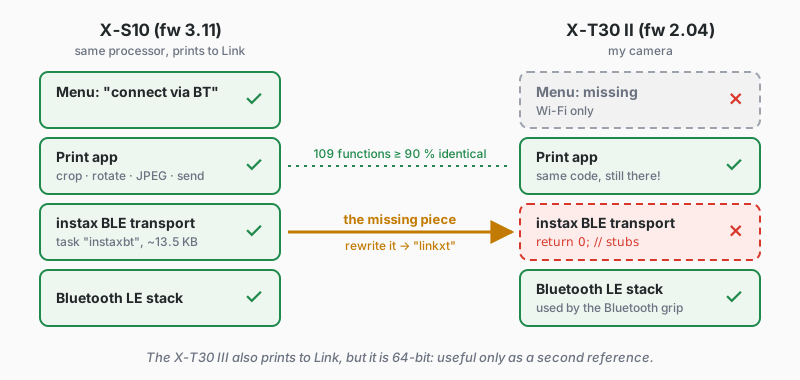
Even better, the camera already knows how to drive a Bluetooth device. Bluetooth LE (Low Energy) is the low-power flavour of Bluetooth used by watches, sensors and printers like the Link 3. In every connection one side is the central, which scans, connects and gives orders, and the other is the peripheral, which waits and answers. Usually the camera is a peripheral: the phone app connects to it. To print, it has to be the central and go get the printer.
The X-T30 II already plays that role in one case: Fujifilm’s Bluetooth shooting grip (most likely the TG-BT1), a small tripod handle with a shutter button that sends commands to the camera. The firmware has a module that looks for the grip and connects to it as a central. So I didn’t need to write a Bluetooth stack, just the missing glue.
I found one more problem at this stage. Before printing, the app needs to know which film is loaded, because a mini and a wide print don’t have the same size or shape. It doesn’t ask the printer directly. It reads the printer’s serial number and looks at the first digit: 1 means mini, 2 means wide, anything else means “unknown printer, stop”. That list was written for the printers that existed at the time. The X-S10, a bit newer, also accepts 4. My Link 3’s serial starts with 7, which no firmware I looked at knows about, not even the X-T30 III. So even with perfect Bluetooth, the camera would have rejected it. The fix is simple: treat 7 as a mini.
Step 3: Writing the missing piece
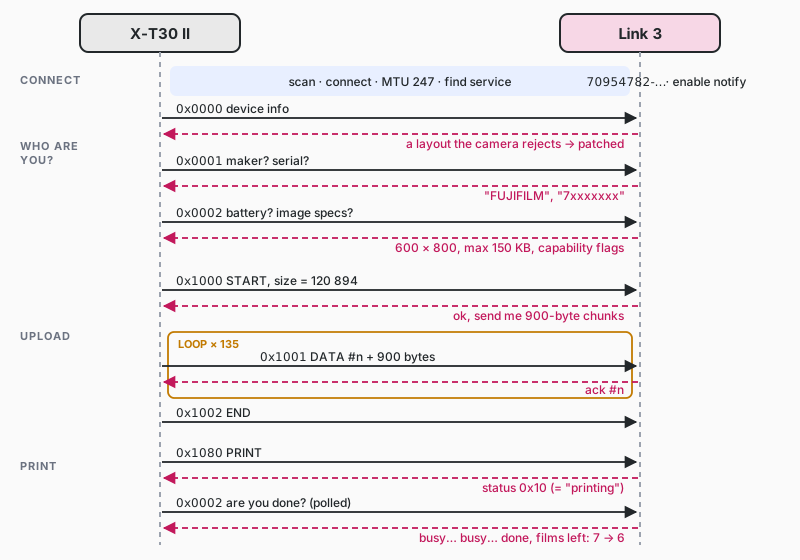
The instax Link protocol is well known thanks to people who recorded the Bluetooth traffic between the phone app and the printer: javl/InstaxBLE, linssenste/instax-link-web and others. It’s simple. Each packet starts with Ab, then a length, an opcode, a payload and a checksum. The camera asks a few questions, sends the JPEG in 900-byte chunks and says “print”.
I didn’t copy the X-S10 code. In a firmware like this, every function and every variable lives at a fixed address, chosen by the compiler when Fuji builds it. When a function calls another one, the call contains that address written in plain bytes. Change one line of code, recompile, and everything after it shifts. Two different cameras are two different builds, so the same function sits at a different address in each. Moving the X-S10 code into my camera would have meant finding and fixing hundreds of those addresses by hand. Instead, Claude and I wrote a small C module from scratch, linkxt. It takes the place of the stubs: the Fuji app calls it, and it calls the Fuji Bluetooth stack.
How do you plug new code into a firmware you can’t recompile? With those same fixed addresses.
In one direction, Fuji calls linkxt. The print app still calls its 12 empty functions (“send the serial request”, “send a chunk”, “print”, “connect”…) at their usual addresses. I overwrite the first 8 bytes of each one with a tiny instruction, “jump to this address”, pointing to the matching function in linkxt. The app has no idea. It calls the stub as always and lands in my code.
In the other direction, linkxt calls Fuji. It needs firmware functions too, to open a Bluetooth connection, send a packet or write a file. I give the compiler a list of their addresses, found in Ghidra, and it calls them directly.
On top of that, a few single bytes change. One switches the print menu from “Wi-Fi printer” to “Bluetooth printer”, and another teaches the serial check about 7.
All these patches go into the copy of the firmware loaded from the SD card (more on that below), never into the camera itself.
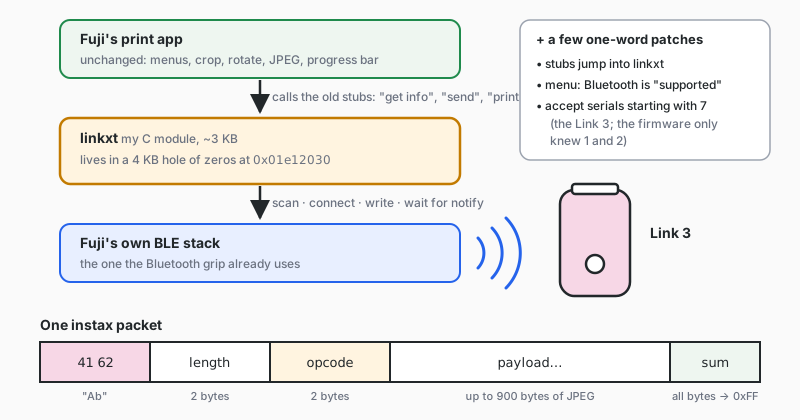
The hard limit was space. The only safe place I found for linkxt was a hole full of zeros in the code, just under 4 KB, so it had to fit in 4048 bytes, including a debug build with logging. Most debugging sessions started with “what can I remove to make room for this new trace?”.
Before touching the camera, every build ran in an emulator. I used Unicorn to run the real ARM binary against a fake Link 3 printer written in Python. It caught a lot of bugs at zero cost.
Step 4: Running it without flashing
Now, how do you run modified firmware without writing it to the flash?
The answer came from jitl and the FujiMod project, found on the FujiHack Discord. Fujifilm cameras can boot from the SD card if you hold a secret button combo at power-on (on mine: Delete + press the rear dial). The card holds two files. ffinit.bin is a tiny loader. ffboot.bin is an image of the whole RAM (72 MB), built from the official firmware. The camera loads that image into RAM and runs it. The flash is never touched.
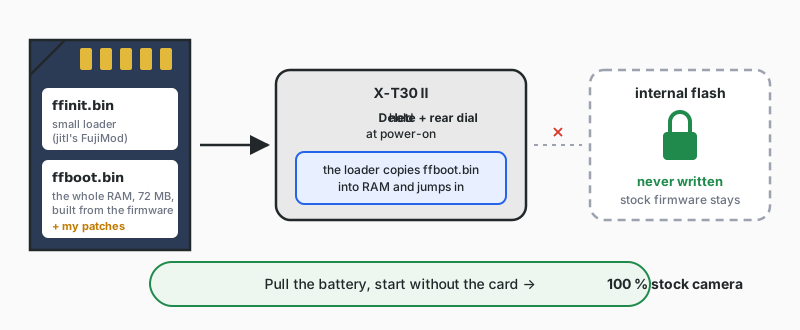
This had been shown to work on other bodies, but nobody had tried it on an X-T30 II. Getting there took 30 trials.
Trial 1: nothing. The camera started normally. I had pressed the front dial instead of the rear one. Trial 2: green LED, black screen. That green LED was jitl’s test loader saying hello: the camera’s boot ROM had read my card. First win.
Who reads the card at that point? Not the firmware, which isn’t running yet. It’s the boot ROM, a small piece of code burned into the processor itself. It can’t be changed and it runs first at every power-on. Its job is to wake up the hardware, then load the firmware from flash, or from the SD card if you hold the button combo. For that it carries its own tiny SD card driver and a FAT reader. Since it’s burned into the chip, its functions always sit at the same addresses. The X-T30 II has the very same ROM as the X100V, and the community had already mapped where everything is in it. So my loaders didn’t need their own SD driver. They just called the ROM’s functions (“init the card”, “read sector N”) by their address. Writing was harder, because the ROM never writes. I had to drive the SD card hardware myself, copying the way the ROM sends its read command.
Then came a long series of black screens. When you boot your own code this early, you have no screen, no debugger, no printf. The only thing I could control was the small LED on the back. So it became my debugger: the loader blinks green once for each stage it reaches, and goes red when something fails. I counted blinks with a stopwatch in hand.
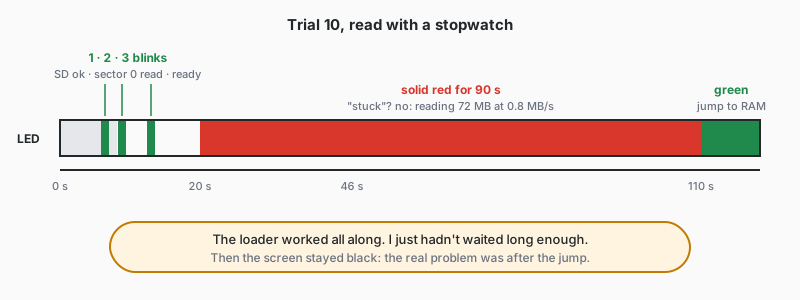
The LED taught me a few things the hard way. First, patience. For several trials I thought the loader was stuck on red, but it wasn’t: the ROM reads the 72 MB image sector by sector, and that takes a minute and a half.
Then, emulators lie a little. One of my loaders froze silently. The C compiler had turned a byte read into a 4-byte read at an address that isn’t a multiple of 4. Once the system is running, that’s fine. This early in boot, the processor refuses it and stops. Unicorn didn’t model that, so all my tests passed. One compiler flag fixed it.
Finally, blinks don’t scale. So I created an empty file, LOG.BIN, on the card from the Mac beforehand. The loader found it with the ROM’s file reader and wrote its log straight into the card sectors behind it. After each trial I opened LOG.BIN on the Mac to see where the boot had stopped.
The log said the kernel started, but the camera app never did. And most of my log points, the ones placed later in the boot, never wrote anything at all.
So why did it take 30 trials? Because the bug was in none of the places I was looking. The card was fine, the loader was fine, the kernel started fine. I found the answer by reading the kernel code on the Mac, not with another trial.
Remember that the 72 MB image is a copy of the RAM: every byte lands at the same address in memory. In that image there is a 128 KB area full of zeros. It looks unused, so jitl’s first boot recipe (“startup”) put some of its own code there, code the app needs later. I did the same with my debug code.
But that area isn’t unused. It’s where the kernel writes its logs, and one of the first things the kernel does is clear it: a short title, then zeros everywhere. Our code was erased a split second before it was needed. When the app jumped to jitl’s code, the processor found only zeros and froze. No error, no log, just a black screen.
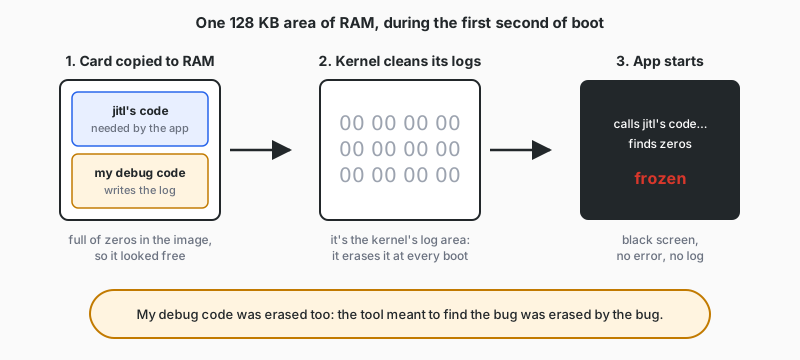
jitl’s recipe had failed the same way on an X100V. His other recipe, “cold”, doesn’t put anything in that area, so I switched to it.
Trial 30: no LED at all, then after a minute or two, a normal live view. But was it really running from the card, or had the camera given up and started from its flash? Trial 31: same card with the big image renamed. Nothing, ever. So trial 30 had really booted from the SD card.
Trial 32: my first mod. It turned the LED red for 10 seconds, then let the camera boot. Useless, and the best red LED I’ve ever seen.
(I also spent a few evenings on a USB “service mode” route that can read and write RAM while the camera runs. It was great for checking my RAM image against the real thing, but useless for running code.)
Step 5: Debugging blind
Once linkxt was on the card, the camera showed a new screen: “connecting”… then “CAN NOT BE CONNECTED”. No details.
I needed logs. In the firmware, I found the function Fuji uses to write A:\UILOG\COUNTER.TXT to the SD card, and I reused it. From then on, linkxt wrote everything it did to A:\LINKXT.TXT. Each trial became the same loop:
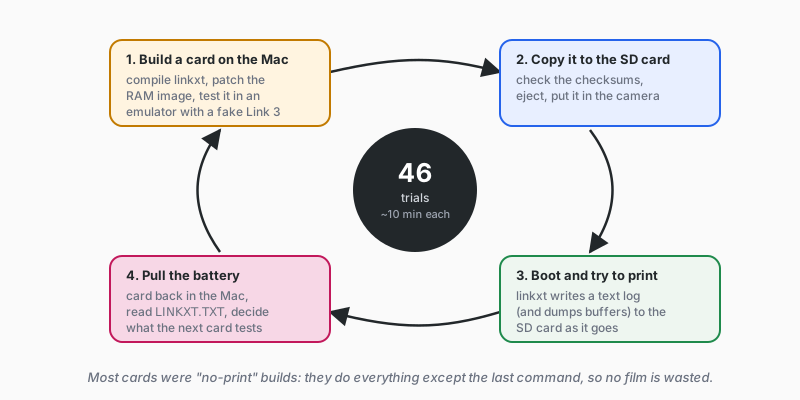
With logs, things moved fast.
On trials 34 to 36, linkxt scans, connects, finds the instax service and turns on notifications. Bluetooth works.
Trial 37 is the first real instax exchange. The camera’s first question is opcode 0x0000, a “who are you, what do you support?” request. The Link 3 answers, but the Fuji app rejects the answer. It expects a set of flags laid out like on the older printers, and the Link 3 sends 00 02 00 00 00 00 instead. I still don’t know what those bytes mean. Since the app doesn’t use them for anything else, linkxt simply replaces them with the values the app wants.
On trial 38, all the questions pass and the photo upload starts. On trial 39, the Link 3 accepts a print, and the film counter goes from 7 to 6!
The pink ghost
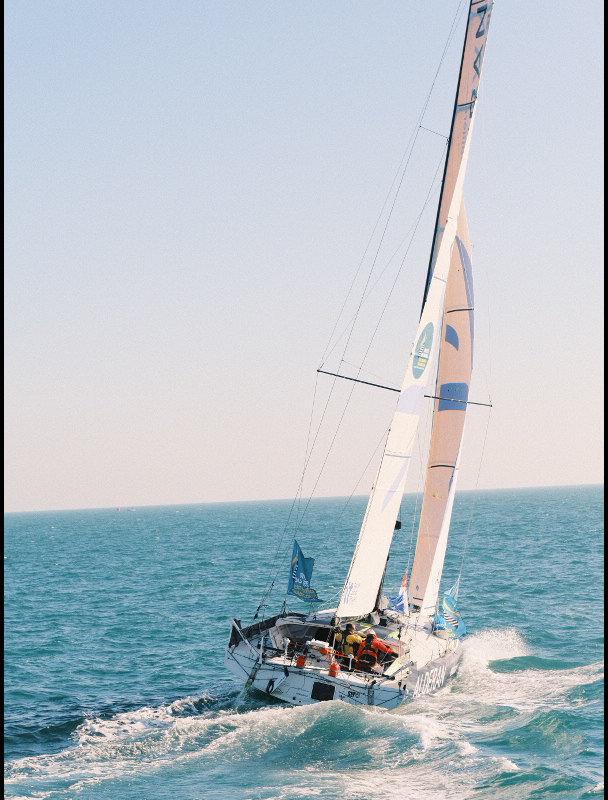
Trial 39 printed. The sheet came out white and slowly developed into… an almost white picture with a faint pink boat. Not quite what I was hoping for.
Since prints cost money, I switched to “no-print” cards. They do everything, but instead of sending the JPEG they save it to the SD card and stop. The JPEG was garbage: pink, zoomed 2×, with stripes on every other column.
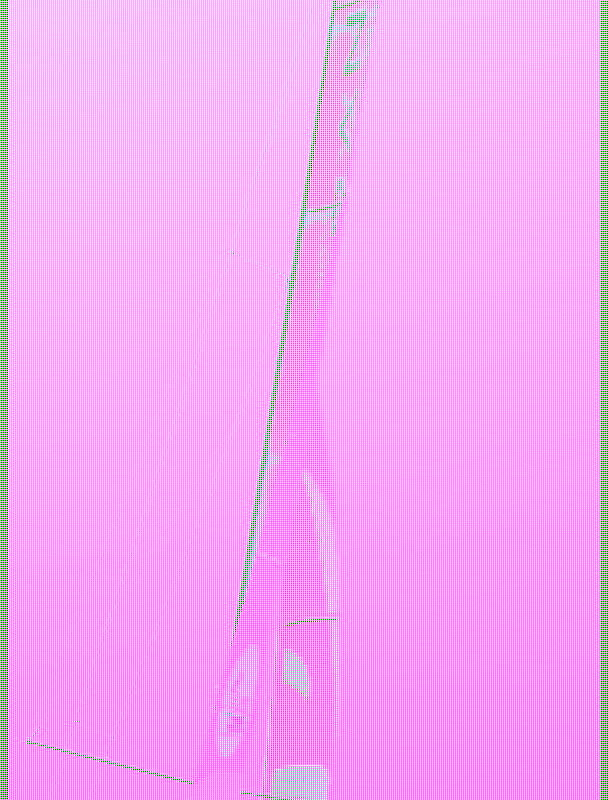
I first suspected my code, then the file size, then the source image (an S-size JPEG gave the same result). It was none of those. So I made linkxt dump the image buffers between each step of Fuji’s pipeline, and decoded them on the Mac.
After the resize, the image was perfect, in YUV (“Y Y U V”). After the rotation, it was not YUV at all but 32-bit ARGB pixels.
Reading the code around it explained everything. In one of its answers, the printer lists its capability flags. When capability bit 3 is set, the app runs an extra colour pass: YUV to ARGB, colour tweak, back to YUV. Then a copy meant for printers without that bit runs anyway, and overwrites the clean result with half of the ARGB buffer. The JPEG encoder reads ARGB as if it were YUV, and you get a pink ghost.
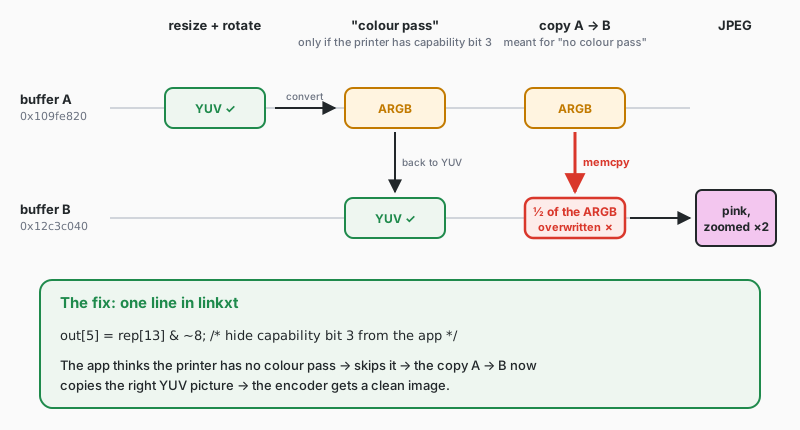
It looks like a real Fujifilm bug. Maybe no printer ever set that bit for this code path, and the Link 3 is the first. The fix is one line in linkxt: hide bit 3 from the app. Trial 45, still without film, gave a clean JPEG.
It works!
Trial 46: real card, real film. I picked a photo in the playback menu, hit “Print”, got a progress bar, and the Link 3 started whirring. A few minutes later, the boat appeared.
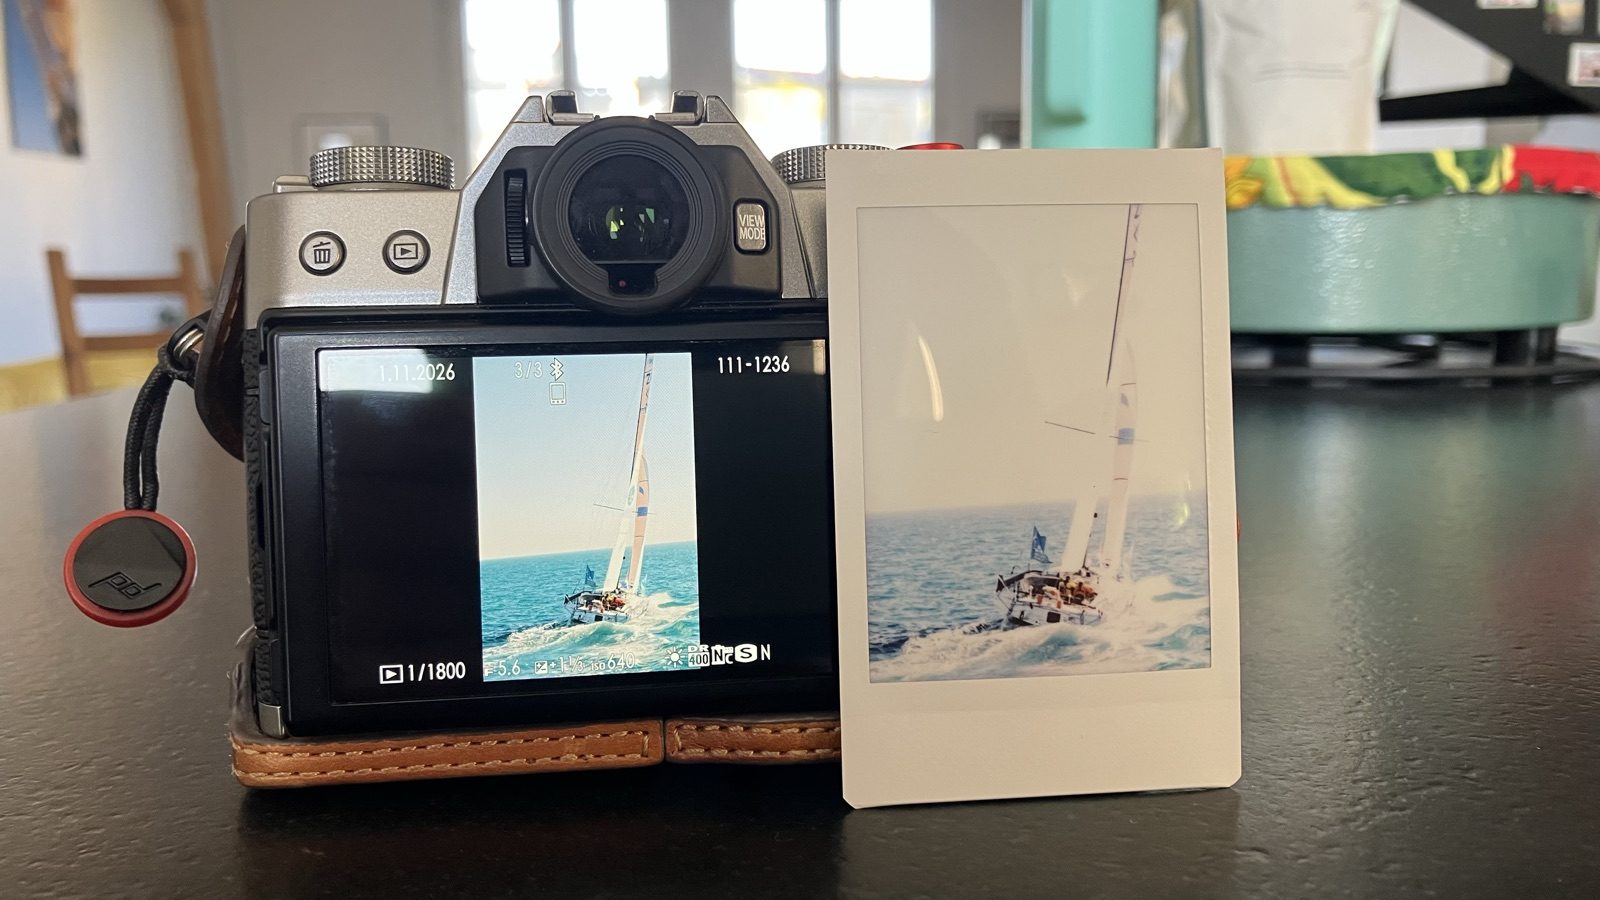
No phone in the middle, and nothing written to the camera. Pull the card and it’s stock again.
Tools and sources
| What | Used for |
|---|---|
| Python | firmware unpacker, function matcher, card builder, buffer decoders |
| Ghidra (headless) | disassembly and decompilation of the X-T30 II and X-S10 firmwares |
| Unicorn | running linkxt against a fake Link 3 before every trial |
| arm-none-eabi GCC | building linkxt (Thumb-2, under 4 KB) |
| Claude Code | reading thousands of decompiled functions, writing the tools and the module, keeping notes |
| FujiHack Discord, FujiMod | SD boot, button combos, and a lot of advice from jitl |
| javl/InstaxBLE, linssenste/instax-link-web | the instax Link protocol |
What’s next
It’s still a debug build, and landscape photos haven’t been tested since the fix (before it, they froze on “Sending”). Next, I want to clean it up and turn linkxt into a proper FujiMod mod.
The code is on GitHub: ronangaillard/xt30ii-instax-link. It contains no Fujifilm code: you download the official firmware yourself, build jitl’s SD boot card (FujiMod’s “recovery” card) yourself, and a script patches it. If you have an X-T30 II on firmware 2.04 and a Link 3, try it, at your own risk, and tell me how it goes.